PIs of MMT programs that will be observed in the MMIRS or Binospec queues manage their catalogs through a web interface. This page documents the catalog management. Most features of the web interface are easy to use; this page provides a reference, and documents some special cases.
Each program has an email contact address, and the contact person will get an email titled "MMT Observatory Queue Observing Form" from the MMT Scheduling System about 1-2 months before the observing run, with a link to log in to the catalog. You must receive and read these emails to be aware of submission deadlines and to be able to log into your catalog. If you can't find the emails, try searching for and whitelisting "MMT Scheduler" and "scheduler@mmto.org".
Logging in takes you to a page that shows the deadlines for slitmask submission and catalog submission before the run, typically about 2 weeks and 1 week before the run starts. You must check a box acknowledging the instructions and submit this form to access the catalog editor.
The mask and catalog deadlines are important to get your masks made and targets verified before the run starts. If your mask designs are not in on time, the masks cannot be machined and shipped to the MMT in time for the run (and MMIRS masks must be loaded into the mask dewar before it is cooled down). Even for imaging and longslit targets, your targets must be added to the catalog by the target deadline before the run so that the instrument scientist and queue observers can check for problems and run queue scheduling software. The catalog will lock before the observing run, and any further changes require the PI to request that MMT staff unlock the catalog. PIs of ToO or time-variable programs must contact the MMT instrument scientist to discuss their catalog, unlock requests, and the procedures for triggering a ToO.
If you want a collaborator to have access to your queue catalog to be able to edit targets and design masks, you can forward them the email with the catalog link, or just copy and send them the link URL containing a token string. Be careful with this link, since anyone with the link can edit that catalog.
The middle of the catalog page shows a table of your targets. To create new entries in the target table, use the new, copy, or upload buttons just above the table. In the upper right of the window is a list of masks that you have designed. There is a distinction between "target" and "mask." A target defines an observation, so you can have two targets that use the same mask, for example, short and long exposure times, or observations in two different semesters.
When you click "copy" to copy an observation, there are some options to browse the current catalog, or your previous trimester's catalogs, etc. Note that some of these have an option to copy "by reference" - this will create a pointer to the previous observation, rather than a new observation. Most of the time, you should do not this, but rather create a new copy (for example, if you have a partially completed observation from a previous trimester, and a new time allocation, you want to make a new copy).
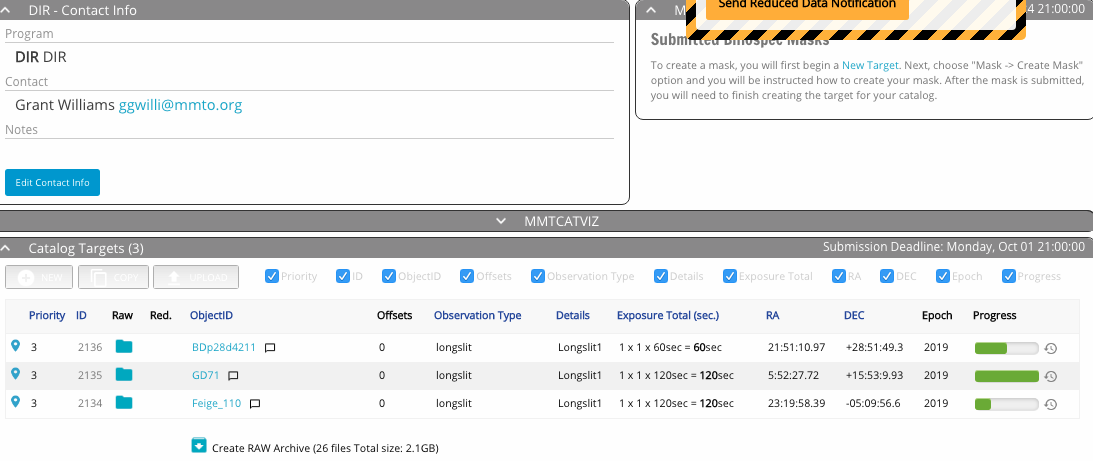
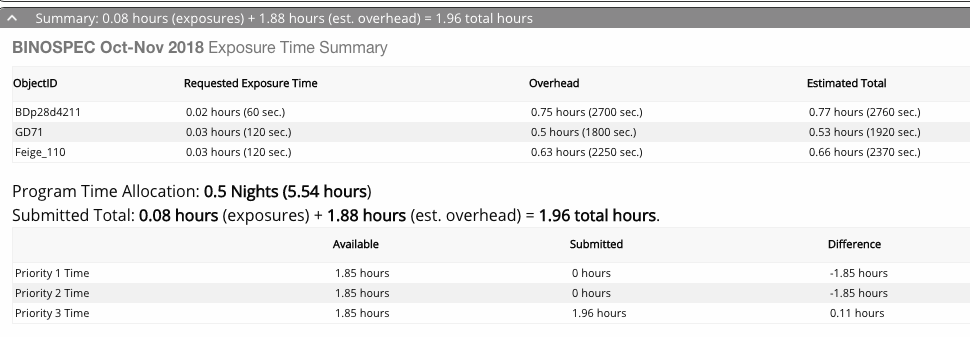
Below the catalog window is a summary of your requested time including estimated overheads. Overheads include wavefront sensing, acquisition time, readout, and calibrations. The queue observers will typically keep an accounting of the actual overhead time used during an observation, and charge that rather than the estimate.
You must assign a priority 1, 2, or 3 to each observation. These help us understand which observations are most important to you and prioritize data taking. Please assign priorities so that roughly 1/3rd of your time is in each category. If you have a small number of targets, splitting in thirds may be difficult - just try to assign priorities reasonably. We look at the overall completion percentage of a program to split time fairly among programs, so assigning priority 1 to all of your programs won't get you more data, it just makes it harder to tell which targets are most important (so don't do that). You don't have to hit the total times exactly or choose unusual exposure times to pack it precisely into the time allocation.
The columns of the target table are mostly self-explanatory. A few useful icons include: clicking the location pin on the left will open a sky visualization of the target; when data is taken, folder and box icons appear in the Raw and Reduced columns for data download; and clicking the clock icon on the extreme right brings up the history of the observing block, including time of observation and observer's notes.
Above the target table is a gray bar labeled "MMTCATVIZ." Clicking this will expand a sky visualization of the location of the targets. To hide it, click the bar again.
To design a new mask, click the "New Target" button/text either in the catalog panel or the mask list on upper right. This will open a new target wizard (series of dialog boxes). Click "mask" and then "create new mask." This should open mask design software in the browser for Binospec; for MMIRS, you run the xfitmask mask design software as a standalone program. Descriptions of the mask designers are available separately for BinoMask and for MMIRS xfitmask. For BinoMask, the mask designer communicates the design directly to the queue database, and for MMIRS, you will run the design program and upload the files.
When done designing the mask, you return to the catalog page, click "New Target" again, and choose "Already Submitted or Existing Mask." This will load the parameters of RA, Dec, PA from the mask design file, and then let you choose exposure time, etc to create an entry in the target table.
It's a good idea to give your mask a memorable name, after your target, program, or PI, eg "ngc5894_v1_mask1" or "JSmith_field2", etc. A unique ID number is appended to the mask name, but having masks with generic names e.g. "Mask3" makes it harder to keep track. Also, if you reuse masks in another semester you'll be glad for informative names.
The queue catalog keeps track of masks that have been previously designed by a PI, so when you make a target with "Already Submitted or Existing Mask," you should get a list that allows you to choose masks that you designed in previous semesters. If you need to find a mask that is not in the list, or if you need to use a mask designed by another person, contact the MMT instrument scientists.
Often, designing slitmasks takes some trial and error, and you may wind up designing a second version of your slitmasks. It helps to add a "_v2" suffix or similar to the names to keep track. If you iterate on mask designs, it's not currently possible to delete the old mask design files, but please contact your MMT instrument scientist to request that the unnecessary masks not be machined.
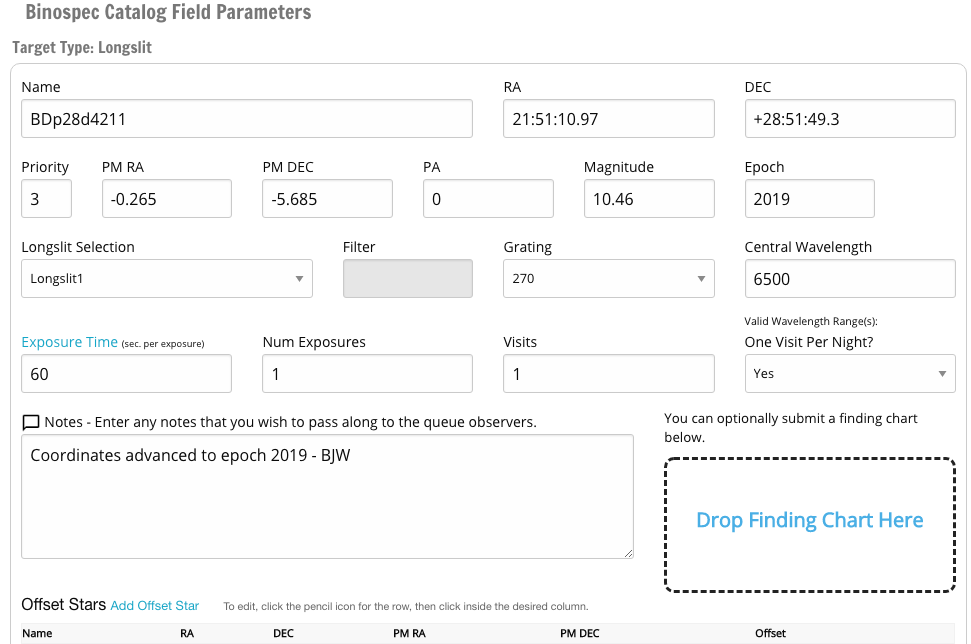
To create a target, use the new, copy, or upload buttons above the table. Clicking on an existing target name in the table lets you edit it. For a new target, the catalog target wizard dialog boxes will appear, and prompt to choose one of the three types of targets: imaging, longslit, or slitmask. For a mask, you then choose from your designed masks, and the RA, Dec, and PA are read from the mask file. For imaging and longslit targets, you fill in the RA, Dec, and PA.
You will fill in typical catalog details: name, RA, Dec, and so on. Use an informative name that is likely to be distinct from other targets in the queue: eg "Virgo_dwarf_1" is better than "Virgo1". If you copy a target, the software will generate a unique name by appending a long number. We strongly recommend editing your target names to some relatively short but unique set of names - long IDs that differ by only a few digits are harder for observers to read at 4 AM.
The catalog input boxes will show help text if input is not in the correct format. Some notes on input formats:
pm_RA (sec of time/century) = pm_RA(mas/yr) / [10 * 15 * cos(Dec)]
pm_Dec (sec of arc/century) = pm_Dec(mas/yr) / 10
The next dialog box sets the exposure time. The total exposure on your target will be
total = (exposure length) x (number of exposures) x (number of visits)For example, if you want six hours on a single Binospec mask, you could enter 1200 sec exposures, 18 exposures, and 1 visit. For Binospec, 1200 sec is the longest recommended exposure time due to cosmic rays. The queue software will break a long sequence up into 2-hour observing blocks for ease of scheduling. If you absolutely need contiguous observations, e.g. for a time sensitive observation such as a transit, put that and the time of the event in your target notes.
The overhead is estimated once per observing block. This means that if you have an exposure longer than 2 hours, you'll get charged more than one overhead. For example, a 6 hour slitmask integration would incur 1.5 hours of overhead (3 OBs x 0.5 hours per OB). Thus, for example, putting in a lot of targets each with 2.5 hours integration will incur more overhead than is optimal - you could give the brighter ones 2 hours and the fainter ones 3 hours, reduce overhead and the number of OBs, and make the observations easier to schedule.
The purpose of the "visit" is to indicate splitting your exposure, e.g. for monitoring programs. So if you wanted to observe a target on six nights for one hour each night, you would specify 6 visits and one visit per night. For this or any other special constraint on observations, please give instructions in the target notes.
Special observation instructions including time constraints, weather/seeing constraints, and requesting dithering, flux standards, or twilight flats, should also go in the target notes.
Clicking on a target name in the target table will bring up a dialog box to edit the target parameters. This box also allows you to delete a target, if needed.
The target creation and edit windows allow you to specify offset stars and to upload a finding chart image. MMIRS can use offset stars. Please note that Binospec doesn't use offset stars, but sets to your target directly; you must have coordinates on the Gaia DR2 reference system (SDSS is close enough) to accurately acquire the target.
For questions about entering your targets and designing your observations, please contact your MMT instrument scientist: for MMIRS, Joannah Hinz, and for Binospec, Ben Weiner. The Hectospec queue is managed independently of this interface by Nelson Caldwell at CfA. The MMT queue catalog management web pages were implemented by Dallan Porter.